When I was working on the electric pendulum clock some years ago I was interested to discover how much the simple compensated pendulum was affected by temperature. It was then I discovered how inaccurate domestic thermometers [picture] were. The clinical mercury ones with the markings directly on the side of the stem were, thankfully, good but the ones with the tube clipped into a wooden or plastic holder were absolutely hopeless. You could put them side by side and there could be a discrepancy of three or more degrees, and this even on some so called Factory Act thermometers. I was dismayed to discover that the electronic variety were not a lot better; I purchased an integrated circuit type to install in the clock and I had to calibrate it in software. So I bought a lab thermometer from an instrument supplier which, though not certified, I could trust to be reasonably good and calibrated the other devices around the house. I found that the linearity on all of them was good and even the delta wasn’t bad but it was the offset which was at fault in most cases—the tube was not fixed into the holder in the right place. This was also true for the electronic ones that they were not calibrated, even roughly, before shipping. One of these, 1.5deg out, was intended to test the temperature of a baby’s bath water.
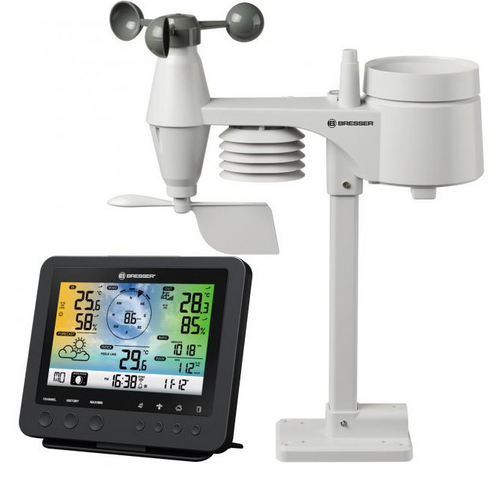 This last birthday I was given something I had a mild yearning for for some time – a home weather station. The remainder of this post is my experience with setting it up and using it. The model I was given, the same as my daughter-in-law, is a Bresser WiFi colour 5-in-1, which is also known in America under the brand name Logia. It comes as two parts – an outside part containing the sensors and an inside display (also containing its own temperature and humidity sensor) and that communicates to the outside part by radio signal (868MHz UK, different frequencies elsewhere) and to the internet by Wi-Fi. It is described as a colour display but this is a bit disingenuous as the colour is a fixed back image with black LCD lettering overlaid!
Now, if you are following this with a view to installing your own, I strongly suggest ignoring the paper instructions that come with it and downloading the American Logia instructions. They are much much better than even the English/German online version available from Bresser. There are small faults in all of them but the American ones are much more comprehensive. In particular you can ignore references to a USB cable (there is no socket), solar panel and Beaufort scale readings which must refer to another model.
Following the instructions the setup is quite straight forward. First insert the backup battery and power the display using the wall wart before inserting the batteries into the sensor unit. Everything seemed to connect ok and it was good that, with both devices side by side they were reading the same temperature and humidity within a reasonable tolerance.
But now where to locate the sensors? We live in a terrace house so I was concerned that if I located it in the back garden that there would be a wind tunnel effect which would distort the wind direction readings. The other alternative was to put it on the roof but some sources said that the temperature sensors were supposed to be about 1.5-2m from the ground. The instructions were not concerned about that, only that it was far enough away from any surface not to be influenced by it, so I attached a pole to the chimney and installed the device about 2m above the roof tiles. Fortunately this was fairly easy as we have a valley roof which is easy to access safely. There were a few snags to this—I first tried to install it part way up an existing aerial pole but that is not possible as the housing bulges out and gets in the way. Then I discovered that you can only mount to to one side of the pole as what they call the pipe clamp would only fit one way round—a careless fault caused by the rod not being symmetrical. Thirdly I tried to install it on a horizontal TV aerial mount (as the instructions suggest) but it is then not possible to align the device to point north without moving the mount which would misalign the TV aerial. So eventually I had to install a new pole on the other chimney. I estimate the the device is now 12m above ground level which becomes important later.
The next thing to do was to register with either or both of the weather aggregator services that you wish to use—wunderground.com and/or weathercloud.net—for this it is best first to discover the exact location of your device, latitude, longitude, elevation above sea level and the height above ground level as you only get one chance to do this without starting again. There are web sites that help you do this such as Google Earth. When you register they give you a device name and a passcode which you need in the next stage. There is no published API so it is not possible to do your own logging of readings for local analysis however the Weather Underground site does report back very detailed readings on demand. It is generally better than the Weather Cloud site though the phone app is not very good.
Finally to attend to the display and communications device. The range of the radio communication is good so there is a strong signal two floors down between the parts. Connecting to the internet and the weather sharing websites is a bit unusual. What you need to do is put the display into Access Point mode by holding down one of the control buttons. Then it becomes its own Wi-Fi station which you can connect to using any device with Wi-Fi and navigate to a fixed IP address from a browser. I wouldn’t recommend a phone as you need to enter some complicated passwords very precisely. A device on which you can easily copy and paste is best. If you need to make any alterations then you need to re-enter this AP mode as it is not possible to communicate with the device once it is on your house Wi-Fi.
The display device is a bit idiosyncratic. Some controls are on the front panel, which in my opinion would work better on a touch screen, and some are on the back. For example to change between Fahrenheit and Celsius, or inHg and hPa for barometric pressure, there are switches on the back but to change between km/h, mph or knots for the wind speed is done by holding down the wind button on the front for a few seconds. A small fault with the display is that in low intensity mode it flickers but it is fine at full brightness (though not in a bedroom). There is little information about what the perception readings (Feels Like, Wind Chill and Heat Index) actually mean and no explanation of Dew Point and its relationship to Humidity so you would be best to look these up on Wikipedia. The display device will also function as an alarm clock but I don’t see the point of that.
How well does it work? Following my earlier experience with thermometers I was pleased to discover that the temperature measurements are pretty good. As far as I can tell the wind speed and direction, and the rain gauge match what is actually happening and accord with weather reports. Barometric pressure is another matter which needed further attention below. At first sight I thought the device was German and translated for marketing in the UK and USA under the Logia brand but now I am not so sure. The online reporting is excessively precise giving, for instance, two decimal places on the hPa, Celsius and mm rainfall readings but big jumps between actual values suggesting a much lower resolution. This may be because the actual readings are in imperial measurements (inHg, Fahrenheit and inches) then converted. Or is this just because the web sites require imperial measurements? There is also the evidence of the much better Logia manual.
I have found that on my unit the baro readings were very inaccurate—under reading by 8 hPa all the time. Yes, I can mentally compensate but that doesn’t put it right for the internet aggregators. At this point (while doing this write up) I discovered the Logia instructions, and these detail an advanced calibration mode. On there you can adjust offsets for all the measurements and it also tells you the firmware version in case it needs updating. The difficulty comes in finding accurate values to calibrate to. The nearest official station to my home is about 10km away as the crow flies so may not have the same weather as here. Trusting that, at the moment, the air pressure doesn’t vary much over a region, I have confirmed that it under reads by 8hPa. Now to do the calculation to allow for altitude is a very complicated equation but an approximation can be assumed to be 12hPa per 100m elevation for most UK populated areas and there is an online calculator—coincidentally(!), for 70m above sea level the offset came to 8.38hPa—so perhaps the device is calibrated for use at sea level? The Logia manual does say most calibration values won’t need changing “with the exception of Relative Pressure, which must be correctly calibrated to reflect your distance above sea level to account for altitude effects.” Doh, why didn’t they make this clear in the first place—the Bresser manual doesn’t even mention that you can do it.
My early conclusion is that this is a very well made and reasonably accurate device rather let down by poor documentation. In particular, with no mention in the UK manual to compensate for altitude, there will be a very high proportion of devices reporting completely wrong weather readings. My house is only 60m above sea level, the readings will be ridiculous for people on high ground.
Update: 10 May 2022
My device now seems to be broken in two respects, fortunately I can get around them. In theory I could return it under guarantee but that would be too much of a nuisance. This seems to have happened about 6 months ago as that is when Weather Cloud reported that I went off air (but didn’t notice until recently)—and I can’t seem to get back on. It accepts the code but doesn’t update. The second failure I know happened around that time and that is the offset between absolute barometric pressure and relative isn’t calculated correctly. I tried updating the firmware but that made no difference. I have worked around that by putting in a false offset which gives the correct results—both on the screen and reported to Weather Underground.
It is now clear (and obvious really) that the barometric pressure sensor is contained in the base station not the remote device. So when calculating the offset required by altitude, it is that height that you should use— about 6m difference in my case.
One of the weaknesses of these devices, at least this model, is the difficulty and lack of instructions for setting the pressure offset. It would be much better if they just required you to input the height above sea level into the device and it to work out the offset for itself. It looks like most people get it wrong. I did a quick look on Weather Cloud for stations within 5km of my home (currently at 1014hPa by my device and 1016 by the most recent Met Office weather chart). The neighbours that are online are reading 1026, 1010, 987, 1012, 1011, 1014, 1004, 1018 & 1021. The altitude maybe varies by 20m or so.


 Webmaster