Archive for the ‘Motoring’ Category

TapHaywire

2 Nov 2008 22:04 by Rick

Friday I left work a bit early hoping to get down to Cornwall in good time. Just as I left the car park I stalled. Well perhaps I didn’t give it quite enough welly but no matter—but it wouldn’t start again.

The AARemoving and replacing the key, everything went haywire; warning lights flashing and flickering, relays clicking and dials jumping and showing random values. Oh help, this looks expensive, but I have to get away so ring the AA.

After only 45 minutes, during which I ring home and explain, a yellow van arrives. The AA man tries it, and thinks, and scratches his head and thinks that perhaps the battery is flat. A meter only shows about 10 volts so out come the jump leads. No luck, it just seems to be soaking it up and losing it. So he suggests trying a new battery—Bingo.

What seems to have happened is that a cell has shorted internally and 10v is just not enough to run the electronics, let along start the car. So, new battery paid for, I am off on my way and only about an hour late.

Thanks very nice man.

TapWhat I learned today

25 Feb 2008 22:12 by Rick

…on my Speed Choice course. That is the course you can go on to avoid getting points on your licence if you get flashed by a money maker speed camera. Actually the course was quite good; I went in expecting to learn nothing because I have moderated my driving over the years so that I now observe speed limits whenever possible, but I picked up a few helpful tips. They guys were really very pleasant and were seriously trying to help—unlike their organisation which seemed to be trying to be as obstructive as possible.

The main thing I learned was how poor the government (for want of a better description) are at communicating changes to the road laws and highway code. For instance, I hadn’t realised that large trucks were not allowed to go any faster than 40mph on single carriageway roads so there is not point in fuming if you get stuck behind one. And that Transit we hired to shift daughter’s furniture—it is supposed to be only driven at 60 on dual carriageways. They don’t tell you that when you pick it up.

I never knew that they had changed the rules about how to recognise a 30mph area when there were no signs. When I took my test it was all about built up areas and the distance between lamp posts, something that was almost impossible to determine. Now it is quite clear—except for motorways, if there are no signs but there is street lighting then the limit is automatically 30.

There were some other hints which I am not so sure about but will give a try; for example they claimed that at 30mph it makes very little difference to your fuel consumption if you stay in 3rd gear, and the car is a lot more controllable. Another is the best thing to do if you are being tailgated is … nothing … or perhaps slow down just a little bit without brakes to create a gap in front; after all, one thing worse than being followed by a bad driver is an angry bad driver.

TapCar identification

22 Oct 2007 14:53 by Rick

I don’t know if there is any kind of privacy or security problem here but I have discovered that many tyre retailer web sites have a system of identifying your car (make, model and colour) from its registration number. For example Kwik Fit or Tyre Shopper tell me that mine is a red Renault Laguna X74 5-door hatchback. I am sure that there must be a use for this.

Update:
I took a look at the DVLA website which gave a link to Release of information from DVLA records and this doesn’t mention this usage of data supplied but seems to be only datasets where the owner/keeper information is included. Following links further I found the DVLA Vehicle Online Services which gives a Vehicle Enquiry service. This requires the registration number and the manufacturer (I can’t see why) but gives quite a lot more information—date of liability (when the tax disk expires I think), first registration, year of manufacture, engine capacity, CO2 emisions, fuel and a few other bits and pieces.

Update 2:
The Motor Insurance Database ASKMID is another route. It tells you the make and model and also, usefully, if it is insured. You are only supposed to use it if you own the vehicle but that is unenforceable except, perhaps, in the extreme case of bulk enquiries.

TapRenault Laguna Radio Controls

6 Aug 2007 08:56 by Rick

This is referring to the model installed in the 2001 Renault Laguna II but may apply to other models as well. If you have lost the handbook, as we have, some of the radio controls are a bit obscure and difficult to find by chance. I have borrowed someone else’s book and here are those instructions.

I have covered setting the security code elsewhere (item 6).

Mute/Pause

Pull both remote volume controls toward you at the same time. Repeat to come out of it.

Tone/Balance Controls

Press the Quaver button. You will then get a selection of options which are controlled by < and > or the remote scroll wheel to change between options and + and – or the remote volume toggles to change their values. The options are BASS, TREBLE, BALANCE and FADER (front to back relative volume). The rear speakers have to be activated in Expert mode for the latter to work.

Tuner Preset

To retain a station on one of the 6 quick buttons, first find it by other means. Then when it is playing, press and hold the desired number button until it beeps.

Tuner List

To change the selection of stations in the list press and hold the Tuner button until it beeps. The search takes some time but they will be stored in alphabetical order of RDS name.

Traffic announcements

The book says you can press the “i” button again to revert back to the main station early but this is not easy to do while driving. I have found it is easier to scroll forward and back quickly on the remote which has the same effect. I wish I know how to change the volume but the book doesn’t mention it.

News announcements

This is a facility rather like the traffic announcement facility but I don’t think it is supported by any UK stations. To enable it, press and hold the “i” button until it beeps. Switch it off the same way.

CD Random Play

To enable this, when the CD is loaded, press and hold the “1” button until the display shows RD.

Expert Mode

In order to invoke Expert Mode, press and hold the SRC button until it goes beep. You now have a series of options you can change in a similar way to the tone controls (above).

  • AF (ON/OFF) controls the alternative frequency system which searches for a better frequency for the same station if reception becomes poor. Often good for national stations but not so good if reception is generally poor or for local ones.
  • SPEED (0-5) controls the increase in volume as you increase speed to compensate for road noise. The higher the number, the more pronounced it becomes.
  • LOUD (ON/OFF) a strange American invention which boosts the bass and treble at low volumes.
  • TUNER (AUT/MAN) setting Manual switches OFF the station seek function in Tuner Manual mode which keeps scanning until a strong enough signal is found. Instead it moves 100KHz for each click.
  • REAR (ON/OFF) controls the back speakers.
  • LIST (MAN/DYN) I’m not sure what this does.

Press SRC again to leave this mode.

Factory Reset

Not something you are likely to need unless you ship the car to another continent. You need the SECURITY CODE to do this! To engage it, switch the radio off, hold down the 2 and 5 buttons and whilst holding them, switch it back on again. You now have a 2 minute wait while it beeps at you then, eventually, it will ask for the security code.

After that is entered, it will ask for the continent. The choice is America, Japan, Asia, Arabia and Other. The reason for this is they use different AM and FM bands. Select the right one with the scroll wheel and then press the button on the underside of the remote (nearest your lap).

The next question is CURVE (0-5) and sets the frequency response to suit the car. The values are 0 (Off), 2 (Clio), 3 (Mégane), 4 (Laguna), 5 (Safrane). I haven’t experimented to see what the effect is. Again press the underside button to move on.

Finally there is REAR (ON/OFF) which is asking about the rear speakers again. I think this relates more to whether they are installed at all rather then if you want them on. If you want to temporally disable them, use expert mode above. Press the underside button for the last time and the radio will be fully operational again.

TapRepairing a Renault Laguna Card Key

6 Apr 2007 17:58 by Rick

A common fault with these keys is that one of the buttons stops working. You can tell when this is a fault with the key rather than the car because the led stops flashing. If both buttons have failed then first try the obvious and test the battery and make sure the contacts are clean. If so then you need to resort to one of two drastic solutions; buy another one (about £130) or repair it.

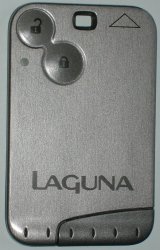
The key before hacking it

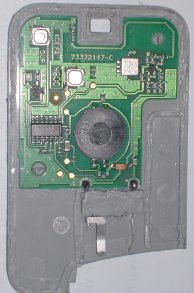
This is the type of key we are talking about, it is the type with two buttons and the safety slot in the end, not the proximity type. There may be other models that use a similar key, I have seen one with three buttons for instance, but I don’t know if they have the same weakness. The fault with these keys is that they use surface mount micro-switches and the “lock” one seems to be on a vulnerable part of the board which perhaps flexes and it drops off. Often you can hear it rattling loose inside.

The tools you will need are a good strong Stanley knife, a soldering iron with a very small tip (1mm or less), some long or curved-nose pliers, a strong magnifier and some super-glue.

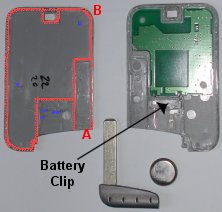
The first task is to get inside. These are not clip-together cases, they are glued all round and on some internal ribs as well. On the photograph of my one below (click for a larger image without my annotations), I have marked the glue lines in red. The blue dots are unglued guide posts. With a strong Stanley knife and starting at the point marked “A” you can carefully cut along the edge, try to cut if you can as it doesn’t split very well—and watch your hands as the blade is liable to slip. When you reach the first bend “B” go back and do the first internal rib, then you can move round peering in the crack to see what to cut next. Be careful not to damage the components or the circuit board. A close inspection of the pictures shows the things to avoid, it is really a matter of patience, care and brute force.

After removing the back

As you can see, mine opened upside down, so the next step is to cut under the battery clip to separate the circuit from the case; I used a small kitchen knife to get in there.

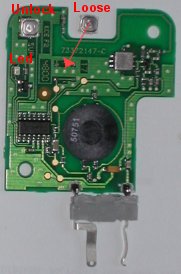
The circuit board exposed

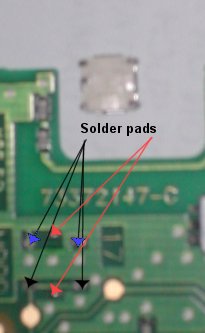
So you should now have all the parts laid out including a loose button switch. This switch has a contact on each corner, two fold-under lugs to hold it together and two other lugs to help it stick to the board (ha! ha!). Sorry, the resolution of our camera is not good enough to see this detail. Near the centre of the circuit board you have a corresponding space with two pads on the earth plane at the top (arrowed blue), two on a track leading to the IC at the bottom (arrowed black) and two isolated holding pads (arrowed red). The orientation of the switch is important, the wrap around lugs MUST be to the sides.

A close up of the problem

With your fine tip soldering iron, clear up and tin all the contacts on the switch. Similarly clean the circuit board pads. You are well away from any delicate components here so there is not a lot of risk. Make a small solder bead on each pad. When I say small I mean small; I used a jewellers eyepiece to see what I was doing, scary with a hot soldering iron inches from my face.

Now lay the switch on top and test that it works by holding the battery in, and pressing the button. If you get the switch the wrong way around, the light will be on without pressing the button. Satisfied that it works you can solder the switch into place—holding the switch down with long pliers, touch the soldering iron to each corner and the top/bottom edges to get the solder to bridge the gap in six places. You may need to go round more than once as the component beds down to the surface. Test it again. As a final touch, I dribbled a bit of super-glue under the switch as an attempt to hold it more securely.

Putting it back together

Now clean up the plastic parts with a knife, removing all loose bits and get the halves to mate together tightly without the circuit. You will also need to clean up the plastic part of the battery clip. Lay the circuit into the back cover, there should be two positioning pegs to hold it in place. Apply a drop of glue to the battery clip to secure it and leave it for a few moments to set. Finally run a bead of glue around the outside edges and the main internal rib, bring the parts together and clamp (clothes pegs) or weight it until it sets. How many of the original lines you do depends on if you are likely to want to undo it again but I would suggest omitting the front of the battery clip.

For the technical, the numbers on the components are: the big round piece (transmitter coil?) is 50751, the DIL package (encoder?) is Phillips PCF7947AT with other numbers 16793102 and DnD00350. The small silvery unit (oscillator crystal?) has EPC05, R727 and M5MN. A Google search didn’t turn up much.

TapHandy tips for Laguna owners (4)

5 Apr 2007 09:18 by Rick

I have been surprised how popular this series has been with readers, attracting many more comments than most. I should point out that I am no expert in this subject, just passing on things that I have discovered either by personal experience, research, investigation or plain logic. To that end I can recommend the prolific RenaultForums which has a much larger group of contributors, some of them quite knowledgeable.

It is from reading many posts on there that I have extracted the following useful tips.

  • The anti-hijack lock. This is the system which locks all the doors (from the outside) as soon as the car exceeds 6 mph. When delivered new, it is switched off. To enable/disable it, with the ignition on (card key fully inserted) press and hold the central locking button on the console until it goes “beep”.
  • Fuses. Having lost my handbook, I am still trying to trace what fuses do what. There are three locations for fuses that I have found, the one by the driver’s knee, one by the battery under the bonnet and one in a very strange place. If you pull out the ashtray (grab it firmly by the sides and pull straight out) then below it is the socket for the engine diagnostic system and a single fuse. This may be for the radio or possibly the cigarette lighter.
  • Tyre pressure sensors. This is a hot topic for discussion but a few snippets emerge.
    • The valves which contain the sensors are quite fragile so care needs to be taken when changing tyres.
    • The metal valve caps corrode and stick on and can cause the valve stems to break when trying to remove them. Many correspondents recommend changing them for plastic ones as soon as possible.
    • The valves are colour coded and a matching code chart can be found on the edge of the driver’s door below the lock. Make sure that the right valve/wheel is on the right corner of the car else the system will get confused.
    • If you get the sensors come on for no apparent reason then try over inflating the tyres by 5-10 psi and then reducing back to the correct pressure to unstick them.
    • If you have to get any new valves then the car computer needs to be programmed to accept the new codes—this seems to require a Renault agent.

As soon as I find some time to repair my bad card key I will post about that and other key related things.

TapRenault Laguna – maintenance warning

2 Apr 2007 19:14 by Rick

Thanks to Andy who commented on my first Laguna posting, I now know how to reset the flashing spanner on the dashboard that tells me that it is time for a service. This is set to come up every 18,000 miles and some independent mechanics don’t know how to reset it.

With the key in the ignition (it doesn’t matter if the engine is running) press the button on the end of the stick to scroll through the trip computer settings. The one you want should have a static spanner and the number zero and is the seventh (and last) one from the start.

Now press the reset button on the dashboard and hold it in. After a few seconds it will flash and then reset to 18,000.

This is correct at least for my 2001 model.

TapSpeedo

5 Mar 2007 12:29 by Rick

The speedometers in cars are notoriously inaccurate. This is something we have always known but with the ubiquity of GPS devices with rather more accurate (if lumpy) speed measuring this has become much more obvious. They are always calibrated to read high so that the inaccuracy will never cause you to inadvertently exceed the speed limit.

This is annoying. Like most drivers with some experience I don’t read the speedometer very often but judge it mentally, only checking the dial when changing speeds (or spotting a camera, but that is another matter). However, even then, we are judging our speed by a previously learned experience based on an inaccurate instrument. It is really noticeable when stuck behind someone doing exactly what they think is the speed limit when you know that they could be going 5 or more mph faster.

The law says that speedometers should be between -0% to +10%(+4 km/h) accurate. As they cannot achieve the -0% by design, they always over read a bit. They work by counting revolutions of the wheels and I thought that part of the inaccuracy was due to tyre wear so I did some calculations. I have 195/65R15 tyres; these are nominally 25″ diameter, i.e. about 807 revolutions per mile. If we assume that a new tyre has about 3/8″ of tread and when worn it is reduced to 1/8″ that is 1/2″ loss on the diameter and now 823 revolutions per mile. This is enough to cause the meter to read 2% fast; certainly significant but not as much as the discrepancy that I observe (nearer 6%). Changing your tyre or wheel size or the differential can make even bigger changes if you don’t get the speedometer re-calibrated.

It ought to be possible to make speedometers more accurate. They could use GPS technology—by setting my handheld device to sample quite frequently it becomes relatively smooth and if this were further smoothed by software and translated to an analogue device it could make a good and accurate meter. Alternatively it should be possible to adapt optical mouse technology. These work on any suitable rough surface, the road would be ideal, and the only thing that would need to be changed would be the range up to about 400 mm to the underside of the car rather than 4mm to the mouse mat and this would probably need a more powerful laser. Pointing the device at the tyre would reduce this necessary range. (I thought of this independently but I see that halfbakery has a similar idea—which proves how daft it is)

P.S. The ACPO formula for determining speed violations is currently 10% +2mph. Police car speedometers are calibrated -5% to +0% (the other way around to ordinary ones) so that they don’t think you are going faster than you really are. Camera speed traps are triggered at an even higher point than this but not enough to compensate for thinking you were in a different speed zone. Those annoying electronic flashing “SLOW DOWN” notices seem to be randomly set and very inaccurate, often reporting about the car three or more in front of you. They have no weight in law.

A House of Lords reply indicated that speedometers are actually manufactured to a -0% to +5%(+10 km/h) tolerance which over-reads still more, not meeting the legal requirement until 120 km/h (about 70mph). In theory when you think you are doing 30 you could be only doing 24 mph though I don’t think many are that bad.

TapThought experiment

7 Feb 2007 15:20 by Rick

In the discussions in the EU today, a limit of 130 g/km carbon dioxide emission is being suggested for cars. I was wondering exactly what that meant.

All carbon emitted by combustion must have gone in via the fuel tank, the oxygen came from the atmosphere. The other major emission, water, is the same—the hydrogen from the fuel and the oxygen from the air—but it is not regarded as a pollutant. Apart from some impurities there is no other input or output from an internal combustion engine.

30 MPG is a good yardstick for a petrol engined car’s performance. It is not a standard as some do very much better and others do a lot worse but it is a value that people understand. Converting to metric this comes out at 12.75km/l, or inverted as 78.4ml/km.

Petrol is made up of a mixture of hydrocarbons with a specific gravity between 0.6 and 0.8—let us say 0.7 for convenience. So we are using 55g of fuel per kilometre.

In the next part I am not so sure of the science but the atomic weight of carbon is 6 times that of hydrogen and hydrocarbons are composed of roughly 2 hydrogen atoms for each carbon. That suggests to me that by weight, petrol is 3/4 carbon and 1/4 hydrogen. Hence we are consuming about 41g of carbon per kilometre.

Oxygen has an atomic weight of 8 and they are 2:1 for carbon in CO2 so the total output is a nice round 150g of carbon dioxide per kilometre so it looks like we need to get nearer 35 MPG to meet the new standard. The calculation would be different for diesel partly due to the different composition and density of the fuel but also because some of the output is in the form of solid (particulate) carbon. I leave that as an exercise for the reader.

The important thing to realise is that size or car, size of engine, speed and fuzzy dice have nothing to do with it. The only thing important is fuel consumption. If your people tractor can do 150mph and still turn in 40MPG then fine … for the moment.

TapTyre tracks

3 Jan 2007 14:18 by Rick

I always wondered how the tyre pressure sensors worked on my Laguna. Now I know, I am not sure that I wanted to!

^ Top