This is a short tutorial on how the audio system works in MacOS X and how to get the best out of it.
If you are a basic user of sound, such as listening to iTunes, streamed music from the internet and perhaps the Skype telephone system then you will have found that it all works straight out of the box. What you will be using can be shown like this…

This shows the program in the centre and on each side are the audio selectors for default input and output shown as rotary switches to indicate that only one can be selected at a time. Simple programs always take input from ‘Default In’ and send output to ‘Default Out’. Obviously playback-only programs will only use the output side but others, like Skype, may use an input microphone as well. Depending on the model of your Mac you will have different inputs and outputs available. My experience is with a Mac Pro and I have on the input side ‘Line In’ (Analogue) and ‘Digital In’ (I don’t seem to have a Mic socket which I always thought was a bit odd). On the Output side I have ‘Line Out’ (Analogue), ‘Digital Out’, ‘Internal Speakers’ and ‘Headphones’. I have bought a USB desk microphone so that adds to the input options.
The selector switches allow you to control what channel is assigned to the default input and output and this is done using the Sound panel in System Preferences as you would expect. On some devices (the analogue ones) you also have a volume control and a mute which are shown as variable pots and the analogue stereo output ones will have pan controls. Digital channels have fixed volumes and pan.
So, if for example, you have connected your desktop speakers to the ‘Line Out’ socket then you would switch ‘Default Output” to “Line Out’ and everything will be fine. Quite honestly, I find the Preferences panel confusing, especially the volume controls. If you are regularly switching things around then a useful accessory to get is SoundSource from Rogue Amoeba. This puts a control up on the menu bar which does the same as the System Preferences (and more) in a more convenient and intuitive form. For instance you can assign ‘System Sounds’ such as the bings and bonks issued by programs to a separate output—I send mine to the ‘Internal Speakers’ out of the way.
[Edit 20 Apr 2013] N.B. For those reading this and trying it on later versions of Mac OS. Lion (10.7) requires the latest version (v2.5.1) however this doesn’t work on Mountain Lion (10.8). Perversely the previous version (v2.5) does, so hunt around the internet for that. You need to run it manually the first time and some people have reported that it can affect the keyboard volume controls (which doesn’t bother me).
In all of this, ‘Headphones’ is a special case. They don’t appear in the System Preferences until you plug them in. What can be convenient is that when you plug them in they mute the other outputs—this is controllable in SoundSource but not anywhere else that I know of.
Monitoring
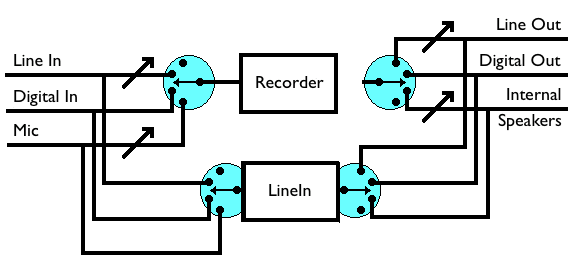
Moving on to more sophisticated programs, some like to control their input and output sources for themselves and bypass the ‘Default Input’ and ‘Default Output’. Skype is like this and allows you to select which microphone you would like to use (if you have more than one). Another little gadget I find useful is LineIn also by Rogue Amoeba. This is a very simple applications, best run automatically at login time, which simply routes input through to output with no modification except a mute button. Not only is this handy for monitoring the input sources if your recorder doesn’t do this, but is also useful just for listening to an external source on your Mac speakers.
Recording
Now if you want to record audio on your mac there are a number of applications that will do it. There is the quite sophisticated Garage Band from Apple and also the freeware Audacity which offers a lot of facilities and plugins. Using the diagram below you can see how to take an input signal, monitor it, record it and subsequently play it back. I use a Windows application called WaveCorrector which has state of the art click removal facilities. To get it to work here I run it under Crossover for Mac which works really well. The Crossover Windows interface only provides basic default input and output channels so I use SoundSource for routing. It does come with a monitoring facility but I prefer to use LineIn because it is there before I start setting up the recorder.

But what if what you want to record is sound that is generated on the computer itself—for instance a streaming radio station via the web browser? There is no way to get the output of, say, Safari, to the input of your recorder. Here another little gadget comes to the rescue…
SoundFlower
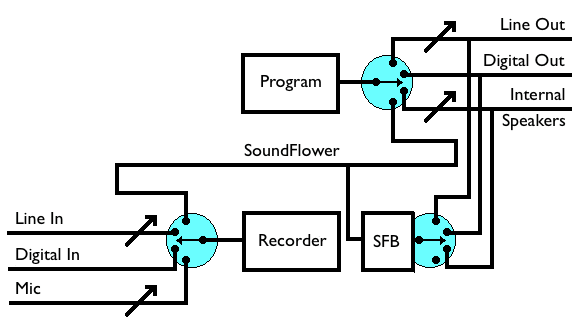
This little application from Cycling74, despite its daft name, does just what is required: but this is where it starts getting a little tricky to remember how to set it up. We will only be using the 2ch option—I think if you are into multi track recording then you are probably beyond this tutorial. Let’s start with a diagram…

Tracking it through from the top you can see that the browser outputs to ‘Default Output”. We have routed this through to SoundFlower using SoundSource. Now SoundFlower does its magic and sends it around to the front again. We set the ‘Default Input” to SoundFlower using SoundSource again and there it is ready to go into the recorder. No sound comes out of the speakers because we have intercepted it so we could use LineIn as before to do the monitoring but SoundFlower comes with its own tool called SoundFlowerBed. This is another application which you run at Login (it can be found in /Applications/Soundflower/Soundflowerbed) and sits on the menu bar as a little flower. You use this (shown as SFB on the diagram) to say where (else) you would like to route the SoundFlower signal to, so we set it to ‘Line Out’ so we can listen to it on the speakers.
Putting it all together
My main audio activities on the Mac are
- Listening to external source (LineIn)
- Recording them (add in WaveCorrector)
-
Listening to Internet sources (Native)
-
Recording them (add in SoundFlower)
To achieve this conveniently the settings I use are
Default Output = SoundFlower.
System Output = ‘Internal Speakers’
LineIn input = ‘Line In’ (actually ‘Digital In because my feed is digital)
LineIn output = ‘Line Out’
SoundFlowerBed = ‘Line Out’
This copes with 1. (output goes via LineIn) and 3. (Output goes to SoundFlower then ‘Line Out’ via SoundFlowerBed), Skype ringing goes to the internal speakers.
For recording I set “Default Input’ to ‘Line in’ (actually ‘Digital In’ in my case) for external sources (2.) and SoundFlower for internal sources (4.). Just one switch to change!
Finally a few cautions. I have found that some recording programs, including mine, like to have the routing set up before you start them up. They ignore any changes afterwards. Secondly be very careful with monitoring options. If used rashly then you can set up a feedback loop and make horrible loud noises. Lastly, if you want to record vinyl records via the ‘Line In’ socket then you will need a device called a “Phono Pre-Amplifier” to boost the signal and also provide some tonal correction. Even though there is this extra complication, a good old fashioned turntable gives much better quality than the USB-ready plastic turntables you can buy these days.


 Yesterday saw a fantastic (free) upgrade to the


 Webmaster