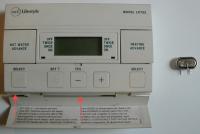
There everyone is, trying to get us to save energy and they make a domestic piece of equipment that has no obvious way to change the battery. Yes, it is rechargeable, but after a while even these will die. They do it with cordless phones, and now I find our heating programmer is the same. After the five or ten years it lasts, we are supposed to throw it away and buy a new one. £60 for the sake of a £2 battery. I am not beaten so easily!
The item in question is an ACL Lifestyle LP722 Programmer. This one dates from about 1990 but it is still made by Invensys under the Drayton brand and, as far as I can see, is very little changed though the brochure says they now have lithium batteries, perhaps they are easy to change.
This older model has a 100mAh NiCd battery, part number V100R. This is no longer made (NiCd is going out of style) but the 150mAh NiMH battery, part number V150H/2p is a direct replacement. I got mine from Cell Pack Solutions for £2 + VAT + P/P = £3.34. Quite reasonable I thought, from a specialist supplier. To find if yours is the same you will have to go through some of the following steps to identify it first and perhaps put it all back together while you wait for the part to arrive.
Now down to business. First you need to make sure you have noted down your program settings. This can be done by stepping through the test sequence on the controls to see when things come on and off. Now you need to TURN THE POWER OFF. This is important for your safety and for the equipment. There should be a double pole isolator or remove the mains plug or whatever is needed.
You can remove the programmer from the wall by loosening the screws marked with the red arrows on the picture above. They don’t need to come right out and, in my case, also watch you don’t drop the screwdriver down the back of the bookcase. Now gently pull from the bottom and then lift it off the lugs. It will be a bit sticky because there are 6 pins to come out of their sockets.
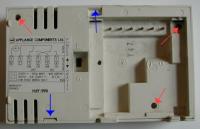
Now turn it over and remove the 3 screws marked with red arrows on the second picture. The back can now be removed but note the clips marked with blue arrows which need to be pushed clear. The back needs to come off leaving the six pins behind so take a bit of care.
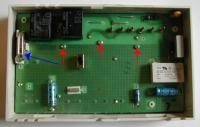
Now you can see the circuit board. The battery is marked with a blue arrow on the third picture. This is far as you need to go if this is a preliminary investigation. You can see what sort of battery you need, though it may be hard to read the number.
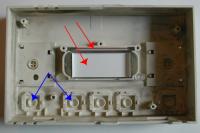
Once you have got your replacement you need to remove the three screws marked with red arrows and carefully lift out the circuit board. This should leave behind the display screen and contact strip marked with red arrows on the last picture. but it may stick to the back of the circuit board. If so, carefully separate them and put it back as shown. If you are unlucky, the cover strip (not shown) and all the buttons will fall out as well. If so carefully put them back in the right order (they have thoughtfully marked the + and – positions) and replace the cover. Take care not to lose the rubber push buttons off the back of the circuit board, but these are all the same.
Now you can de-solder the battery; a de-soldering wick or solder pump is best for this, otherwise you will have to use three hands and a pair of pliers! Assemble the new battery in the carrier and solder it into place—the single pin side will need to be soldered on both sides of the circuit board.
To re-assemble, reverse the process above. Be sure to get the rubber buttons correctly located. Don’t over tighten the screws as it is easy to strip the thread. Once it is all back together you can replace it on the wall by hooking over the lugs first then firmly pressing it into place before tightening the screws. Now switch the power back on. It will need re-programming but after about 3 days it should be re-charged and providing a backup.


 Webmaster
Fantastic. You have provided the solution to my problem. I have just replaced the battery. I saw that the date inside the device was 1993, lets hope I get another 14 years out of it. I thank you.
I found a great place to replace all kinds of batteries. Anything from laptops to camcorders, cordless phones etc. the site has a cool name for battery replacement
well done that man – found your very useful information, ordered the £2 battery as you suggest and it saves me the £30 for a new unit – if it arrives ok your replacement step by step instuctions will be very handy – thanks again
Many thanks for putting this blog together. Always nice to get one over on the manufacturers.
Battery ordered and duly installed. Three days later, job’s a good ‘un. Wife’s made up as she was the only person to understand how to programme it!
Thanks again
Jim
Well done buddy, just replaced my battery using a replacement from cell pack solutions and it works a treat. Thanks for the tips. It always seems a waste to spend £40 to £50 on a replacement programmer if you can replace the battery!
Thanks again, Steve.
I found your blog after searching around google for the battery on this timer. As a fully skilled electrician i would like to thank you for sharing this information with people. I have now replaced the timer battery on the PCB which I managed to get from a company called the small battery company.
Thanks once again. John
Hi, My Dad’s got a LS722 (prob early version of LP722), wonder if this battery can be used. I was always led to believe that NiMH batts couldn’t be charged in a NiCD charger as they are prone to blowing up. Would be interesting to know if yours is still ok? Cheers
Tony.
PS Am assuming it was the 1.2V version. There appears to be a 2.4v etc as well on the Cell Pack Solutions website.
Cheers
Tony.
Hi Tony, I think NiMH are ok in NiCd systems so long as they are not charged too fast. Mine is still working. I can’t recall what voltage it was, I don’t think there was an option when I got mine. Looking at the pictures I would guess the 1.2v as the 2.4v is much fatter and won’t go into the clip. Check on yours to see if it looks the same.
Many thanks for providing a how-to guide re. fitting a new battery to my old LP722 controller. You’ve saved me lots of money & hassle. In short, you’re a star! The funny thing is that the instructions which came with the controller didn’t say anything about the need to replace the battery in a few years. I suppose the manufacturers assume that you’ll splash the cash on having a brand new one fitted, which is a bit silly really. Thanks again for the clear instructions. Much appreciated!
Thanks for the excellent instructions. Replacing and soldering the battery is tricky without the 3 hands! I snipped the old battery’s single pin which then allowed me to bend the battery over sufficiently to insert a small screwdriver under it for gentle leverage when unsoldering. This then left the single pin to be pulled by small pliers when unsoldered. The replacement battery had shorter pins so I have had to install it without the cradle – but it works.
Thanks for the clear instructions.
Why can’t they use a clip/slot like they use on computer motherboards instead of having to go through this rigmarole. It makes me even more suspicious that they want us to throw them away and buy a replacement just because the battery has died! Not green and quite infuriating.
Many thanks for this very useful post.
I today changed my battery. I replaced the Varta V100RT with a V150H (1.2v). Just a couple of points. Better to order the battery version with pins. If not, you may have to solder directly onto the battery (heating the battery). Also, the dry contacts for the LCD display may cause a problem when reassembled. Mine did. I was able to solve this by adding a new screw near the LCD (at the position shown by the top red arrow in the photo above) to pres the PCB against the LED contacts. After this all appears to be well.
Many many thanks. Without this blog I would not have attempted to change the batteries in these timers.
A few points. A Varta 55615201940 is a V150H 1.2v with legs on (PCB mount) obtainable from Farnell @ £2.05 + VAT etc. This fitted my August 1991 LP711. My LP522 May and Aug 2001 look exactly the same but have Varta CR 2032 Li-Mg 3v batteries. These can be changed by carefully prising off the spot welded clips from the battery with a small screwdriver and slipping in a new CR2032 from Boots or a supermarket.
I am very grateful for the information on replacing the battery. I have what appears to be the same model programmer as shown in your pictures. It’s been working for the past 19 years without any problem, except for the battery no longer charging. Following you very clear instructions, I too have managed a successful replacement. Thanks again.