Archive for the ‘Technical’ Category

TapCat5 (and Cat6) connectors

21 Jun 2007 18:01 by Rick

Cat5, Cat5e and Cat6 standards of network cabling are commonly used for computer networks but can also be used for other purposes such as telephone, and video. They were originally rated at 10Mb, 100Mb and 1Gb respectively but the limits have all been pushed.

The cable

The cable itself consists of four twisted pairs of wires. By convention these are numbered 1 = Blue (Bl), 2 = Orange (Or), 3 = Green (Gr) and 4 = Brown (Br). Each pair has one wire in a solid colour and one striped with white and the important feature is the twisting which gives it the high bandwidth and low cross talk characteristics. Normally this will be unshielded though shielded and individually screened are sometimes seen in hostile conditions. The difference for Cat6 is that the pairs are separated in the cable by a plastic cross partition, the wiring is the same. No connection should be more than 100m long with (ideally) no more than 10m of that being patch cables. There should be no kinks with bends with a radius of no less than 25mm. Use Velcro cable ties if possible as the normal ratchet ones squeeze the cables too tightly.

The connectors

RJ45 plugThe connectors are flat and latched on the wide face, called RJ45 (unlike UK telephone plugs which are latched on the short edge). There are variations for each Cat level so be sure to get the right type. Looking at the top (flat) face with the cable towards you, the pins are numbered 1 to 8 from the left. It is important that the twists in the pairs are maintained as close as possible to the connectors.

The T568B standard is the most common wiring pattern, and that is what I will assume for this article.The A version of the standard interchanges pairs 2 and 3 (orange and green). T568A can be used so long as you are consistent within any one installation and the standards people say that the A scheme should be used for all new installations but everyone seems to ignore them. Pre-made patch cables are invariably to the B scheme but, as I said before, it still doesn’t matter which you use so long as each run is the same both ends. See how your patch panels are wired before deciding.

The T568B pattern

RJ45 plug wiring

pair 2    pair 3    pair 1    pair 4
W/Or Or   W/Gr Gr   W/Bl Bl   W/Br Br
1    2    3    6    5    4    7    8

Looking at the top of the plug, this comes out as

W/Or Or   W/Gr Bl   W/Bl Gr   W/Br Br
1    2    3    4    5    6    7    8

RJ45 socketSockets vary in how they are set up. many should be connected

Or   W/Or W/Gr W/Bl Bl   Gr   Br   W/Br
2    1    3    5    4    6    8    7

punch-downThe reason for the difference is that there are internal twists inside to maintain the performance. Others use punch-down blocks like the patch panels below. For T568A conventions, interchange the orange and green pairs in all of the above.

Cat5 Patch PanelPatch-panels often use a punch-down block with coloured markers. The striped wire goes first (on the left) when in the normal BLOG order (BLue, Orange, Green, brown). Again, the internal wiring sorts out the order on the pins.

pair 1    pair 2    pair 3    pair 4
W/Bl Bl   W/Or Or   W/Gr Gr   W/Br Br
5    4    1    2    3    6    7    8

Cross-over

Normal patch cables are wired straight through, pin 1 to pin1, pin 2 to pin 2 etc. For Ethernet, pair 2 is send and pair 3 receive and this allows computer to be connected to a hub or switch. A cross-over cable reverses the send and receive pairs so that connections computer to computer or switch to switch can be made directly. The plug on one end is wired as follows (coincidentally this is also the T568A pattern)

W/Gr Gr   W/Or Bl   W/Bl Or   W/Br Br
1    2    3    4    5    6    7    8

If you are using (or planning) Gb Ethernet then your cross-over cables will also need to reverse pairs 1 and 4. Cross-over cables are often not needed as much equipment has a cross-over button or a special uplink socket or, now auto-senses and changes over automatically.

W/Gr Gr   W/Or Br   W/Br Or   W/Bl Bl
1    2    3    4    5    6    7    8

Fixed wiring, sockets and patch-panels should never be wired cross-over fashion, it will only confuse people.

Some special use connection patterns

10Mb and 100Mb (fast) Ethernet only uses pairs 2 and 3 (orange and green). Power-over-Ethernet uses pair 1 (blue) as the +ve and pair 4 (brown) as the -ve up to about 13W in the standard wiring configuration. Gb Ethernet uses all four pairs so power-over-Ethernet is not possible with this. No special connections are required.

Analogue telephone over Cat5 uses pairs 1 and 2. I have seen it suggested that a single cable can be split to use two pairs for Ethernet and the other two (pairs 1 and 4) for telephone but I wouldn’t recommend it. Use RJ45 throughout with standard connections and adapters for phone use if required. Pins 2 and 5 (on the telephone plug) are the signal, pin 3 is the bell and pin 4 ground. Pins 1 and 6 exist but are only used for PBX digital lines.

1    2    3    4    5    6    7    8 RJ45
|    |    |    |    |    |    x    x
4    3    6    2    5    1           BT type socket

If you are short of cable outlets then you can get special adaptors to run Ethernet and telephone over the same wire – but they are expensive! Note that, for some unaccountable reason, BT plugs number in reverse order to the sockets.

ISDN connections are the same as for Ethernet but I don’t know what pairs they use.

VGA and Video over Cat5 is now cost effective for those longer runs and requires a matched pair of adapters, often powered at at least one end. Standard wiring connections are used.

Finally one that you won’t come across, but I happen to need—Sun Netra and Cisco Serial console connection (plug), the other end of the patch lead being standard order.

Br   W/Gr Gr   Bl   W/Or W/Bl Or   W/Br
1    2    3    4    5    6    7    8

TapVirus Scare

16 Jun 2007 13:39 by Rick

I had a bit of a fright this morning; AVG (free) kept saying that it had found an infected object but it wouldn’t put it in the Virus Vault where it should go. I was bothered because I don’t do viruses, I consider myself too smart for that (lookout, the sky is falling in). I see a few go past in email and I used to have trouble when my anti-spam system kept a copy of recent emails in plain text (it now keeps them in a database, so that is resolved). I have just installed a trial of Prevx so wondered if that may have triggered something but I don’t think so.

Some analysis and a few blunders later I discovered.

  • The infected file was in C:\System Volume Information\_restore{DF9 …a lot of hex… F08}\RP108\A0024948.exe. If I remember rightly this is the System Restore area. I don’t recognise the file name, perhaps System Restore mangles them?
  • This accounts for why my working (LUA) account could not vault it, because I don’t have access.
  • It is reported as I-Worm/Stration.DJC. This is normally distributed by ICQ (which I don’t use) but has been seen recently in spam email—I am unlikely to have executed any attachments.

The blunder was that (in a panic) I deleted the system restore area before scanning the system; I seem to drop out of Security Analyst mode when I come home. Anyway I did a full system scan and a run of the Kaspersky Online Scanner for good measure. Nothing else was found.

What I don’t understand is

  • How it got there. I thought System Restore was backing up things that changed during an install so that you could back them out later. If that is the case, it should have been live on my system before whatever install replaced it and there should be some other traces left.
  • Why AVG should have been looking there in Resident Shield mode anyway. I thought it only checked files that you accessed, and that is not likely to be one of them.

It will, no doubt, remain a mystery.

TapVideo Night

14 Jun 2007 09:24 by Rick

When we reviewed the copyright licences for the church to cover the reproduction and projection or songs and music, we also obtained a Video Licence, because we thought it might be useful. And so it has turned out, with clips and short features being used, not regularly, but fairly often during services. Many, like charity promotions, would be royalty free, but others most certainly would not. Similar material has also been used for the Sunday school and youth meetings.

So, I have been asked, “why not have a Video Night?” An occasion, perhaps when some worthy but secular film could be shown as an opportunity for people to meet together and enjoy themselves. This got me looking at what the terms of the licence actually were.

It should be well known that video films purchased or rented are generally for personal home use only. You are not supposed to invite in all the neighbours to see the latest blockbuster, though if you had a party and it happened to be playing in the background there is not a lot anyone could do about it. What the Church Video Licence seems to do is to allow and formalise this situation with the payment of an inclusive royalty. You can show what you like*, when you like, so long as you: use original legal recordings (no copies of copies and no material recorded from TV)**; don’t charge for entrance; and don’t pre-announce what will be shown.

It is this last point that will tax the imagination of the organisers. To play fair with the privilege granted by the licence we should adhere to the spirit as well as the letter and, as such, it is more likely to work with the youth club or elderly people’s social (as it should) where they would be coming anyway, rather than an occasional general parish gathering. Although the possibility of a Film Club is mentioned in the information, I can’t see it working well in practice. The titles shown should be chosen by the organiser and not pre-announced, though suggestions could be invited from the members so, I suppose if you were following a themed program then it may be possible. Anyway, those are the rules and if you can work with them then go for it.

* There are actually a limited number of producers participating but it seems to cover most of them.

** This also means that you can’t edit them, so no censorship, though you can show an extract as a clip.

*** Note that you may also need a PRS licence to cover the music content of the films though the information is ambiguous. I think what it means is that you need the licence if the film is shown outside of a worship service.

TapExecutable White-listing

12 Jun 2007 16:07 by Rick

It is one of the fundamental rules that, if you want a really secure system, you start by switching everything off and then just enable what you need. This goes for firewalls and accounts for why many that come pre-configured in routers are not very good because they have to let so much through to enable all potential customers to operate; and why ZoneAlarm (the basic version only) is so good because it asks you before enabling anything.

Based on this, the principle behind all Antivirus software is flawed from the start. It is trying to detect what is bad by various means and then blocking it. You can never win at this game; you are always trying to catch up with the perpetrators which is why we now have to accept daily updates and I have seen some offering them hourly. It is also why they can justify a subscription pricing model rather than a one off cost.

But you can go some way towards this goal very easily; just don’t run your day-to-day activities from an administrator account. Administrator accounts should be for administration—that is installing software, taking backups and doing system updates. What you need to do is create another account and using the facility provided in Windows XP, mark it as LUA, a “Limited User Account”. 95% of software works perfectly well in this mode. If you use some very old programs that you have to run then you may have some problems but they can usually be circumvented. However I will (and you should) complain like mad if a new program does not work when run in this way; it is just negligent of the author. The big advantage of the limited user account is that when you are browsing and reading mail and something nasty does get in, then it no longer has access to the heart of the machine and the damage it can do is limited. Most bad-ware will try and install itself in system folders and the machine registry and that is just not possible in this mode. Think of it as running a power tool with the guards in place. You do need to lift the guards sometimes, but not with the power on and only to change the blade.

This article by Marcus Ranum (beware, some strong language) takes this concept a stage further. Here he describes how he has fought to get the complete control he wanted so that only the programs he specified would run. First he tried to use Windows Execution Control. I don’t know the facility nor if this is a fair evaluation of the mechanism but it failed miserably for him. Subsequently he tried using a product called PrevX. The main problem here was that they annoyed him with their marketing techniques but it did look doubtful that it was really doing what it said it did. [I could ask here how someone apparently so experienced in security matters could possibly get infected so often but I suppose that, during research, he may be deliberately working on the margins of safety].

Finally (so far) he found a free-ware product called Exe Lockdown from Horizon DataSys. I tried for quite a while to locate the download as it doesn’t seem to be linked anywhere but eventually found it here. If it does what it says on the box then it should work in a very similar way to ZoneAlarm i.e. maintain a table of permitted programs to execute and if you try to run one not in the list, come up with an “Allow or Deny” prompt. It adds one extra detail which may be of use for those controlling systems used, for example, by children; it asks for the Administrator password before permitting the change. Otherwise it all looks very straight forward.

It works because viruses and other bad-ware need to execute to do anything to your system. If they are not known then they will have to ask and there is a reasonable chance that you may notice at this point and deny them. It is not foolproof though; it will not catch macro viruses such as those embedded in documents or script codes such as Java-script in web pages but it will stop many so it is very valuable and the others will be partially controlled by your LUA.

[Update: Well it was a good idea. First the version I found was only a limited function demo. The link to buy the real thing went nowhere and I couldn’t get it to work anyway. If anyone knows of a program with a similar function then I would be very glad to hear of it.]

TapInstalling MinGW

2 Jun 2007 20:47 by Rick

One thing I have noticed about much free and OpenSource software is that often the instructions for complete Noobs are very poor. Many lack

  • Any good advertising of where the packages can be found.
  • Any good description of why you might want them (see Firefox extensions for some good examples)
  • Any “Getting Started” instructions on what to download and how to install it.
  • Any place to get help.

Of course, not all fail in all of the ways, MinGW is better than some.

What is MinGW

MinGW stands for Minimal GNU for Windows and is a project to enable the extensive GNU software library to be run and utilised from a Windows environment. For many people, myself included, this means access to the excellent compilers and accessories. This enables you to compile and distribute your own and OpenSource software without requiring that the end user load a new runtime environment, libraries or DLLs unlike some similar systems like Cygwin. In particular, I use it to build a Win32 version of HTML-Tidy.

This is complemented by MSYS (which stands for Minimal System) which is a subset (fork) of Cygwin and creates a Unix-like Bourne shell environment but it is important to note that neither depends on the other and can be used independently. You can use MinGW from Windows Command Prompt if you like (though there are no GUIs).

How do you install it

This was something I struggled with even though I had done it before; a long time ago. Some of the instructions don’t appear until after it is installed. I am going to describe installing both MSYS and MinGW because it is easier to install the latter using MSYS, but you don’t need to use it again if you don’t want to. On the download page you need to skip past the Candidate section to the Current section. There you will find lots of packages.

Installing MSYS

First you will need the exe bin for MSYS (currently MSYS-1.0.10.exe). This installs very easily as it is a proper Windows Installer. Run it under a Windows Admin account and take all the defaults so that it loads into C:\msys. You get a lot of information pages with pauses; you can make notes but I will cover most of them below. The only thing I have seen which it gets wrong is that it puts the desktop shortcut into the current user rather than “All Users” so you may need to move it.

Preparing for MinGW

Create a new folder C:\mingw ready to accept the files.
The next stage is a bit tricky if you are not familiar with Unix and the “vi” editor so you may need to follow the instructions letter by letter. What we are doing here is connecting the MinGW install folder to the MSYS system. We also connect up a “home directory” in your Windows “My Documents” folder for convenience. Note that the “/”‘s go the other way to what you are used to in Windows and you don’t need to type the “$ ” which is the prompt on many lines.

Open up MSYS either from the desktop icon or from “Start | All Programs | MinGW | MSYS | msys”. This will give you a command-like window but white with coloured bits rather than black.
$ cd /etc
$ vi fstab

Now you need to type the single letter i (for insert) followed by
c:/mingw /mingw
c:/DOCUME~1/Rick/MYDOCU~1/mingw /home/Rick

No newline on the very end but exit from insert using the “Esc” key (top left of the keyboard).
Of course, instead of Rick, substitute the name of your normal day-to-day Windows login account. If it is a long name or in Windows fancy format with spaces etc. then you will need to use the DIR/X command in a Windows CMD shell to find out what its short name is.
Now type ZZ (note they are capitals) which is a shorthand save and exit command and you should now be back to the “$” prompt. Type exit to go out of MSYS. Now when you restart it you should be able to cd /mingw and be in the folder you created at the start of this section.

Installing MinGW

You will now need to download the MinGW packages you need from the web site. In the same “Current” section, I would suggest that you start with “mingw-runtime” (currently version 3.9), “mingw-utils” (currently 0.3) and “binutils” (version 2.15.91). The packages you are looking for are marked “bin” and all end in “tar.gz”. If you are going for the compiler you will also need “gcc-core” (version 3.4.2) from the gcc section, the Windows API “w32api” (version 3.6) and the make command “minggw32-make” (version 3.80.0-3). Curiously the latter is an exe at the moment. Put all these files in c:\mingw. Now if you go to your MSYS window and type
$ cd /mingw
$ ls

you should see the same files.

Now we can start installing them. This is the bit which is most useful to do from MSYS. First a little hint. Copy and paste in MSYS and most Unix-like systems works differently to Windows. Any text selected is immediately copied to the clipboard, you don’t need to type CTRL-C. To paste it to where the cursor is, click the middle mouse button. No middle button? Try clicking the wheel, it usually functions as a button as well. No wheel? Perhaps time for a small monetary investment.

Most of the files you have downloaded are compressed tar files. Compressed you will understand and it needs the “gunzip” program to uncompress them. This is provided in MSYS so, doing the first package, you need to type
$ gunzip mingw-runtime-3.9.tar
Note that it doesn’t have the “.gz” on the end (though it could) and the easiest way to do this is to select the text from the ls you did earlier and paste it onto the command line after typing “gunzip “.
Tar stands for tape archive and is a very old unix file format used for aggregating files for shipping. The tar program is provided in MSYS and one command which can be used to extract the files is
$ tar -xfpvB mingw-runtime-3.9.tar
Note the capital “B” and the file name is identical to the above and is probably still on your clipboard for paste. The files are extracted into multiple directories which you can see with an ls command or Windows Explorer. If you have finished with it you can delete the tar file or archive it somewhere; it is not needed in this directory any more.
You need to do this for each of the packages except “mingw32-make”.

Installing “make”

For some reason, “make” is installed using a Windows installer so you just need to run the exe. You just need to answer the questions and accept the default install folder C:\mingw. Now it needs a little configuration in MSYS.
$ cd /bin
$ mv make.exe mingw32-make.exe
$ cd /mingw/bin
$ mv mingw32-make.exe make.exe

This is to effectively comment out the low function MSYS “make” command and enable the fully functional GNU one.

Finishing up

You can now log out of the Windows Admin account and into your normal day-to-day account. Create a folder “mingw” in “My Documents” and then you can start up MSYS. Type ls and you should be able to see any files in your new personal “mingw” directory and you are ready to go and start using it.

If you are going to use the MinGW stuff from the Windows Command Prompt (CMD) then you need to put C:\mingw\bin into the search path so the programs can be found.
To do this right click on “My Computer” and select properties (or select “System” from the Control Panel). Select the Advanced tab and on there the “Environment Variables” button at the bottom. If there is a PATH variable in the top section then select it and click Edit, if not then click New and create one called PATH. Don’t touch the System variables in the bottom section, that is dangerous. Add the string ;C:\mingw\bin to the value (note the semi-colon which is needed to separate values but not if it is the only one). Click OK three times to get out.
Now you need to logout and log back in again and it will be all ready to go.

Running gcc from MSYS

This couldn’t be easier.
$ cd
$ gcc -o program program.c

and you are there.

Running gcc from Windows Command Prompt

Just as easy; open a CMD window by opening “Start | Run…”, enter cmd into the box and click OK. This will give the familiar black window that used to be called DOS.
cd My Documents\mingw
gcc -o program program.c

and there you are again!

TapRed faces at Symantec

30 May 2007 15:43 by Rick

Symantec Security Response Researcher Ron Bowes has written an article which claims that a unix based system that uses sudo can be compromised by manipulating the search path.

When you cut all the waffle about spelling mistakes, “.” in the path and scripts executed in error, what he is saying comes down to (using bourne shell) …

$ echo "echo 'exploited!'; whoami" > /tmp/mount
$ chmod +x /tmp/mount
$ PATH=/tmp:$PATH
$ export PATH
$ sudo mount /dev/cdrom
Password:
exploited!
root
$

However the writers of sudo(8) were not as dumb as all that. If it was that easy it would have been blown years ago and, in fact, would not have been worth creating at all. I don’t know if he actually tested the code that he wrote but if he did, and it worked, then he had a seriously broken sudo implementation.

The “main” protection offered by sudo, to pick up on a point made by Mr. Bowes, is that it checks that the path to the command about to be executed matches the one permitted by the sudoers(4) table. /tmp/mount does not match /sbin/mount so it will not be granted root authority—indeed it will not be executed at all by sudo, the real one will be.

TapGive me the power

29 May 2007 15:04 by Rick

Figure of EightWhen you buy equipment these days you can never be sure what power connectors you will need. Disregarding the wall outlet types, which vary in different countries and also bypassing the seemingly hundreds of low voltage connectors designed so that the wart from one supplier won’t fit equipment from another, we still have a problem with AC mains connectors.

Ace of Clubs
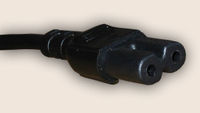
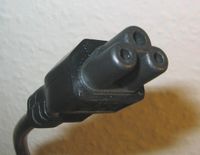
Starting at the domestic end of the market, power inlets can be flat two pin with a notch on each side (Figure-of-Eight) rated at 2.5A. These are IEC-60320 type C7/C8. If the equipment is earthed then it will be an Ace-of-Clubs type plug called type C5/C6.

By far the majority of pro-audio and computer equipment has a three pin type commonly called a Europlug 
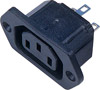
Euro plug rated at 10A, properly known as type C13/C14. They are common, probably because they are cheap, but do have a habit of falling out if knocked. This is sometimes incorrectly called a Kettle plug kettle plug but that one should have a side notch making it type C15/C16 for high temperature use. They are interchangeable one way round and I have also seen them used in 13A applications (like kettles!).

C19/C20When you get to the big stuff then there is the similar Euro style plug but with horizontal pins rated at 16A called type C19/C20 (or C21/C22 C21/C22 if bevelled). A more recent addition to the choice is the Neutrik Powercon Neutrik NAC3 Powercon for up to 20A. This is a lovely compact design based on their earlier loudspeaker plugs (which we called hose connectors) with a bayonet fit and latch. Grey ones are outlets, blue ones are inlets and they are not interchangeable.

At the top end, often seen on lighting gear and main power feeds, are what are known as Commando plug 
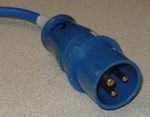
Commando, Caravan or BS4343 plugs, huge blue things with caps on the sockets. The correct name is IEC-60309 and if they are 43mm diameter then they are 16A, if bigger still then they are 32A. These are industrial specification, water resistant and virtually indestructible. They come in other colours and pin numbers for different voltage, frequency and phases but there is no risk of connecting them up wrongly as they don’t mate.

Round pin Individual lighting units normally come with the old UK 15A BS 546 round pin plug (you may find some low power ones that have the smaller 5A plug) and it is best to stick with them rather than change them all to the newer 13A square pin because you will find it easier to hire lamps.

Another variety, for which I can’t find a picture, is the Wago plug, used on some UPS and power distribution systems. They have three pins in a line and a latch.

There are a lot of others, for example US two blade plugs and the old Bulgin plugs which, fortunately, are not used on new equipment but you may find them on antique devices.

When you include the panel and inline, male and female, angled and straight and whatever, this is far too many different types. I just wish they could standardise.

TapBlueyonder – Spam source

25 May 2007 15:23 by Rick

One of the leading commercial anti-spam companies, Trend-Micro, who run the MAPS system compile a weekly rogues gallery of ISPs and the amount of spam generated from their networks.

Blueyonder (our ISP) is number 42 having generated 71.4M spam emails last week in the last 24 hours.

No wonder we keep getting blocked.

Mind you, that is nowhere near as bad as BT (number 24) or Orange (at number 8 with over 300M spam). These figures are not factored by the size of the customer base, but that is probably right because the more customers, the more collective pain they experience when they are blocked. Smaller ISPs don’t appear explicitly if they buy their network from larger suppliers.

I have commented before on the stupidity of blacklists, but at least this one is contactable and apparently accountable. Why should the misdemeanours of a few customers impact the whole community?

TapHeating Programmer Battery

23 May 2007 22:28 by Rick

There everyone is, trying to get us to save energy and they make a domestic piece of equipment that has no obvious way to change the battery. Yes, it is rechargeable, but after a while even these will die. They do it with cordless phones, and now I find our heating programmer is the same. After the five or ten years it lasts, we are supposed to throw it away and buy a new one. £60 for the sake of a £2 battery. I am not beaten so easily!

ACL Lifestyle LP722 Programmer

The item in question is an ACL Lifestyle LP722 Programmer. This one dates from about 1990 but it is still made by Invensys under the Drayton brand and, as far as I can see, is very little changed though the brochure says they now have lithium batteries, perhaps they are easy to change.

This older model has a 100mAh NiCd battery, part number V100R. This is no longer made (NiCd is going out of style) but the 150mAh NiMH battery, part number V150H/2p is a direct replacement. I got mine from Cell Pack Solutions for £2 + VAT + P/P = £3.34. Quite reasonable I thought, from a specialist supplier. To find if yours is the same you will have to go through some of the following steps to identify it first and perhaps put it all back together while you wait for the part to arrive.

Now down to business. First you need to make sure you have noted down your program settings. This can be done by stepping through the test sequence on the controls to see when things come on and off. Now you need to TURN THE POWER OFF. This is important for your safety and for the equipment. There should be a double pole isolator or remove the mains plug or whatever is needed.

You can remove the programmer from the wall by loosening the screws marked with the red arrows on the picture above. They don’t need to come right out and, in my case, also watch you don’t drop the screwdriver down the back of the bookcase. Now gently pull from the bottom and then lift it off the lugs. It will be a bit sticky because there are 6 pins to come out of their sockets.

Programmer back

Now turn it over and remove the 3 screws marked with red arrows on the second picture. The back can now be removed but note the clips marked with blue arrows which need to be pushed clear. The back needs to come off leaving the six pins behind so take a bit of care.

Programmer circuit board

Now you can see the circuit board. The battery is marked with a blue arrow on the third picture. This is far as you need to go if this is a preliminary investigation. You can see what sort of battery you need, though it may be hard to read the number.

Once you have got your replacement you need to remove the three screws marked with red arrows and carefully lift out the circuit board. This should leave behind the display screen and contact strip marked with red arrows on the last picture. but it may stick to the back of the circuit board. If so, carefully separate them and put it back as shown. If you are unlucky, the cover strip (not shown) and all the buttons will fall out as well. If so carefully put them back in the right order (they have thoughtfully marked the + and – positions) and replace the cover. Take care not to lose the rubber push buttons off the back of the circuit board, but these are all the same.

Programmer inside case

Now you can de-solder the battery; a de-soldering wick or solder pump is best for this, otherwise you will have to use three hands and a pair of pliers! Assemble the new battery in the carrier and solder it into place—the single pin side will need to be soldered on both sides of the circuit board.

To re-assemble, reverse the process above. Be sure to get the rubber buttons correctly located. Don’t over tighten the screws as it is easy to strip the thread. Once it is all back together you can replace it on the wall by hooking over the lugs first then firmly pressing it into place before tightening the screws. Now switch the power back on. It will need re-programming but after about 3 days it should be re-charged and providing a backup.

TapGreen Geek (2)

08:33 by Rick

About a year ago I first posted my concern about how much equipment I leave on standby in the house. Since then I have noticed that electricity bills have been a bit on the high side and I was suspicious about the UPS device. This 3kW unit is seriously over our requirements and I was wondering if it had a high overhead.

I have thought for many years that a useful device would be an ammeter reading up to 15A with a mains plug on one end and a socket on the other and had considered building such a device. It came as a pleasant surprise, recently, to discover that not only was such a device manufactured but Maplin had one on special offer—only £15 at the time.

So I put it to work.

Of the original list

  • UPS 3kW rating
  • Router (P90 PC w. no disk drive)
  • Ethernet Switch
  • NAS controller (NSLU2 slug)
  • NAS drive (x2 in standby)
  • Print controller (Pricom)
  • Printer (in standby)
  • Cordless phone charger

that is leaving out the Cable modem and Wireless Access Point which are not on the UPS, the total power usage is 80–85W, little more than a light bulb. I think the variation is whether the UPS is on trickle charge or resting. At current rates that will be costing us £15 per quarter. This is not a huge amount, but significant. Now I need to start testing other things.

Note: Useful rule of thumb at current prices (8.243p/kWh)—1W consumption =approx. 70p per year.

With my desktop running with its two screens and the NAS drive spinning the consumption goes up to 230W. Definitely an incentive to switch it off when not required. Here is a list which I will add to over the next few weeks.

Equipment on all the time

UPS etc. (list above) 80–85W
Wireless Access Point 4W

Equipment switched on as required

PC in use 65W
19″ TFT screen in use 40W
USB disk (difference from standby) 5W
Halogen desk lamp 20W
Laptop in use (charging) 40W
Laptop in use (full) 23W
Laptop off (full) 1W

^ Top