A common fault with these keys is that one of the buttons stops working. You can tell when this is a fault with the key rather than the car because the led stops flashing. If both buttons have failed then first try the obvious and test the battery and make sure the contacts are clean. If so then you need to resort to one of two drastic solutions; buy another one (about £130) or repair it.
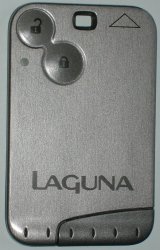
This is the type of key we are talking about, it is the type with two buttons and the safety slot in the end, not the proximity type. There may be other models that use a similar key, I have seen one with three buttons for instance, but I don’t know if they have the same weakness. The fault with these keys is that they use surface mount micro-switches and the “lock” one seems to be on a vulnerable part of the board which perhaps flexes and it drops off. Often you can hear it rattling loose inside.
The tools you will need are a good strong Stanley knife, a soldering iron with a very small tip (1mm or less), some long or curved-nose pliers, a strong magnifier and some super-glue.
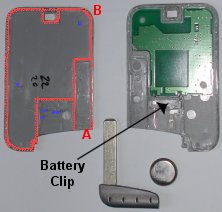
The first task is to get inside. These are not clip-together cases, they are glued all round and on some internal ribs as well. On the photograph of my one below (click for a larger image without my annotations), I have marked the glue lines in red. The blue dots are unglued guide posts. With a strong Stanley knife and starting at the point marked “A” you can carefully cut along the edge, try to cut if you can as it doesn’t split very well—and watch your hands as the blade is liable to slip. When you reach the first bend “B” go back and do the first internal rib, then you can move round peering in the crack to see what to cut next. Be careful not to damage the components or the circuit board. A close inspection of the pictures shows the things to avoid, it is really a matter of patience, care and brute force.
As you can see, mine opened upside down, so the next step is to cut under the battery clip to separate the circuit from the case; I used a small kitchen knife to get in there.
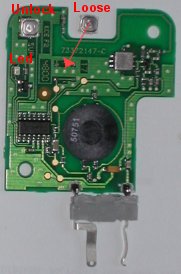
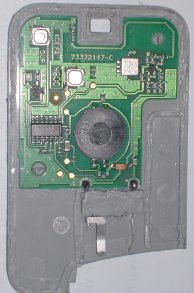
So you should now have all the parts laid out including a loose button switch. This switch has a contact on each corner, two fold-under lugs to hold it together and two other lugs to help it stick to the board (ha! ha!). Sorry, the resolution of our camera is not good enough to see this detail. Near the centre of the circuit board you have a corresponding space with two pads on the earth plane at the top (arrowed blue), two on a track leading to the IC at the bottom (arrowed black) and two isolated holding pads (arrowed red). The orientation of the switch is important, the wrap around lugs MUST be to the sides.
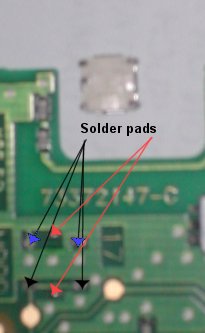
With your fine tip soldering iron, clear up and tin all the contacts on the switch. Similarly clean the circuit board pads. You are well away from any delicate components here so there is not a lot of risk. Make a small solder bead on each pad. When I say small I mean small; I used a jewellers eyepiece to see what I was doing, scary with a hot soldering iron inches from my face.
Now lay the switch on top and test that it works by holding the battery in, and pressing the button. If you get the switch the wrong way around, the light will be on without pressing the button. Satisfied that it works you can solder the switch into place—holding the switch down with long pliers, touch the soldering iron to each corner and the top/bottom edges to get the solder to bridge the gap in six places. You may need to go round more than once as the component beds down to the surface. Test it again. As a final touch, I dribbled a bit of super-glue under the switch as an attempt to hold it more securely.
Now clean up the plastic parts with a knife, removing all loose bits and get the halves to mate together tightly without the circuit. You will also need to clean up the plastic part of the battery clip. Lay the circuit into the back cover, there should be two positioning pegs to hold it in place. Apply a drop of glue to the battery clip to secure it and leave it for a few moments to set. Finally run a bead of glue around the outside edges and the main internal rib, bring the parts together and clamp (clothes pegs) or weight it until it sets. How many of the original lines you do depends on if you are likely to want to undo it again but I would suggest omitting the front of the battery clip.
For the technical, the numbers on the components are: the big round piece (transmitter coil?) is 50751, the DIL package (encoder?) is Phillips PCF7947AT with other numbers 16793102 and DnD00350. The small silvery unit (oscillator crystal?) has EPC05, R727 and M5MN. A Google search didn’t turn up much.


 Webmaster
How much will you charge for repairing my card key?
Hi pindy, I don’t do repairs but if you look back at previous comments on this post you will find links to companies that do.
I’am from Holland. I repaired my Laguna card key by replacing the two switches. They do function perfect. The problem is after gluwing the two parts together; I can’t place the card key into the card holder of the car.
The key does not say “click”, it won’t get in? Does anyone know what kind of problem this is? Do I have to read out the card at Renault service station?
Thanks
Hi marcel, the only thing I can think of is that you need to trim some more old glue off as the card is now too thick for the slot.
FANTASTIC Thanks, took me about 30 mins and job done, I’m well chuffed :o)
Hi Rick,
I have a big problem with my card. We have opened the card but when I look to your picture of the card, I see a component that is missing on my card. It’s really missing.
We have
Maby you know what sort of resistance must bu placed there. I have marked it on the picture.
[img]http://www.foto-uploaden.nl/upload/da07e702ab240a935d667d2e85bf537e.jpg[/img]
We have cleaned the circuit board pads. And the knobs + the led light is working good. But the doors would not open ore close.
Thank you
I have bought a new card key for my 51 laguna to be told that the engine management computers are from a 52 laguna and the key has been set up by renault for the 51 and it cannot be coded to my car. I was informed that i would need to purchace a new key for the 52. When i asked if my new key could be sent back to renault to be re coded the answer was no!!!!! what a suprise. Can you tell me if this is true or am i been had
i can buy a new card key for my laguna renault
i lost my card key 52 laguna and i bought a new card key but i need to fix, thanks
Really excellent guide – it has saved my mate a lot of money.
The solder rework was easy enough for me (I’m an electronics engineer) but the cutting open of the case was quite tricky. I used quick set epoxy to glue the case back together.
Hi Rick,
Independently from your blog, I cut the case apart rather clumsily but can see the lock switch is detached and floating around inside. I checked the led still lights when the switch is held onto the pcb so I can probably glue and solder it back in. Hopefully the glued case won’t be too thick for the ignition slot!
This is the second card that’s failed in exactly the same way (both supplied with the car).
Seems like good business for Renault service eh?
Have you heard of anyone successfully complaining to Renault for bad design and a free replacement?
Best Regards,
Andrew.
Rick,
I’ve managed to open up the key and identified that both switches need replacing. You wouldn’t know what these switches are and where I could find them, would you?
Thanks
Rob
Hi Rick. My case is different. I own a megane II 2006, and after 4 years of use the slot does not recognize the card after I droped it on a concrete surface. The open/close function is perfect. Now I am using the replacing card but need a new one that costs me around 250 euros in my country. Is there a solution for me?
If I recall, the later Megane keys work differently without the locking pin and proximity detection over a larger distance so, no, I have no idea.
Thanks for the guide! I’ve cut open a 3 button laguna II card and was surprised to see the circuit board is glued to the back side under the buttons (no access to the components).I need to inspect the components as the card only worked when slightly bent (not exactly hands free operation)… Any suggestions on how to proceed further ? Thank you!
I’ve not seen a three button key so can’t really help you. I presume that change to glue the case on the front was an attempt to solve the problem I describe by making the whole thing less flexible. If you think it has the same fault then you will need to get at the component side so you will have to find some way to separate the circuit board from the case.
my keycad often wont start my laguna. When i plug it in the slot the only light dat comes on is the immobiliser light!!!!! any ideas??
I have had my renault laguna for 2 years and i have had to buy 4 keys for it. thats over £500 on keys alone. I have just ordered my forth key a few days ago and was told this could take 10 days to arrive from france. I call renault customer services to be told that the will not pick up the tab for this. I noticed that renault were on watchdog, I am considering doing the same, but I cant do it alone, can anyone help me please. Thanks
Hi Rick, since I am from Holland too this is more a question for Marcel from Holland (comment 83) but maybe you can advise also. I can’t find the correct microswitches. Can you advise what type/brand/dimensions these are?
kind regards,
Tim
Sorry – I don’t think I can help. They are much smaller than anything I can get from my local components store. I think you would need to go to a specialist.